Posts Tagged ‘Stampin’ UP!’
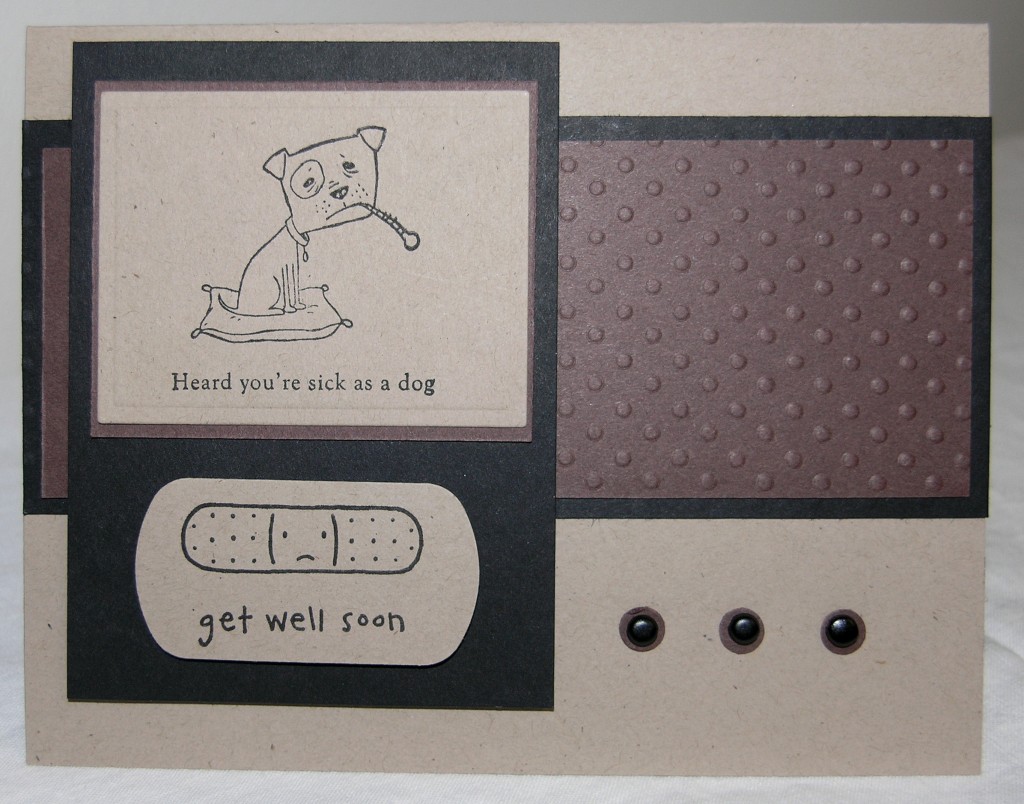
Wanted to get this card in the mail. I'll share the details with you later.


Bee Happy
Today I attended the Share What You Love event for Stampin’ UP! Demonstrators organized by Sally Nusbaum. It was an awesome day spending time with some phenomenal and talented designers who share their love for paper crafting. There were product and technique demonstrations, make-and-takes, and an awesome card swap. On top of all of that, we had snacks, delicious lunch with a Chocolate Gooey Butter cake for dessert. Talkin’ about a WOW factor, that dessert will always be on my mind.
Today I am featuring the card that I offered as my swap. This design is not mine. I found it on Dawn Olchefske’s blog. I did very little to modify her design as her video was very clear and left nothing to figure out. The originality of this design is the texturz plate created using the Sizzix Big Shot and Stampin’ Up’s Daisies #2 Flower die (114520).
The base of the card is Basic Black (5 ½ x 8 ½ folded in half and scored). Set this aside until the rest of the design is completed.
Follow Dawn’s video to create the texturz plate and run you whisper white cardstock (4 x 3 ¾) thru the Sizzix Machine. Sponge daub the centers of each daisy with Crushed Curry. Mount this to a Layer a piece of Crushed Curry (5 ¼ x 4)
Next comes mount a piece of Crushed Curry (3 ¾ x ¾) onto a piece of Basic Black (3 ¾ x 1). Stamp the sentiment from the Picture This (Hostess, Retired) on Crushed Curry and punch out using the Curly Label Punch (112208) and attach to the back of this Basic Black Strip. Mount this unit on the Daisy Unit. Tie a simple knot using the Black Gingham Ribbon (104832).
Lastly, mount onto the Basic Black base.
The great thing about this texturz plate is that once it’s created, it can be used over and over again. I can’t wait to try some of the other Sizzix dies to create texturz plates for dry embossing backgrounds. They add a subtle elegance to any project.
Summary
Stamps: Picture This
Paper: Basic Black, Crushed Curry, Whisper White
Ink: Basic Black
Accessories: Big Shot, Flower Daisies #2, Curly Label Punch, Ribbon, Adhesive

Thankful Thoughts
This week’s card features the Autumn Meadows Designer Paper Series from the Holiday Mini Catalog using 2 of the coordinating patterns. Both stamp sets are also from the Holiday Mini Catalog.
The base of the card is Chocolate Chip. Set this aside.
The first unit mat for the DSP leaf pattern paper is More Mustard. The second mat for the striped DSP is Really Rust trimmed with the scallop punch. Adhere these together and wrap with Chocolate Chip 5/8” ribbon. Then tie a piece of More Mustard ribbon with a simple knot.
Stamp the leaf from the Autumn Splendor stamp set with Really Rust on Naturals Ivory cardstock. Emboss the frame if desired. Double mat with Really Rust and Chocolate Chip. Adhere to the card with Dimensionals
Stamp the sentiment from the Grateful Greetings stamp set in Really Rust. Punch out with the Large Oval Punch. Double mat this using the Scallop Oval Punch and the Oval die from the magnetic Movers & Shapers Punch Windows. Adhere to the card with Dimensionals.
Summary
Stamps: Grateful Greetings, Autumn Spendor
Paper: Chocolate Chip, Really Rust, More Mustard, Naturals Ivory, Autumn Meadows DSP
Ink: Really Rust
Accessories: Sizzix Big Shot, Large Oval Punch, Scallop Oval Punch, Scallop Oval Die, Ribbon, Dimensionals, Adhesive
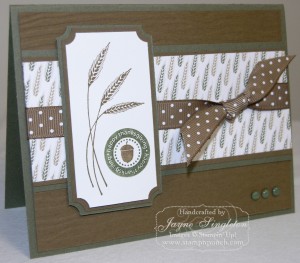
Soft Suede cardstock is a rich color that has to be seen in a card to truly appreciate its splendor. I was so pleasantly pleased with the results of this card. I wanted to use this particular pattern from the Autumn Traditions DSP because I haven’t seen it used very often on other blogs. This color palate would make a fitting masculine card for any occasion.
The base of the card is Always Artichoke. Set this aside. Texturize a piece of Soft Suede cardstock with your Sizzix Big Shot. Create a horizontal group using Always Artichoke, Soft Suede and the wheat pattern DSP. Mount this to the texturized Soft Suede. Wrap this with the Soft Suede ribbon and tie a simple knot. Using the mat pack and paper piercer for placement, attach the Always Artichoke brads in the lower right corner for balance.
For the vertical unit, stamp a scrap of Whisper White cardstock with the wheat stamp from the Autumn Days stamp set using Soft Suede classic ink. With Always Artichoke and Soft Suede Stampin’ Write Markers, ink up the happy thanksgiving stamp from the Falling Leaves stamp set. Give it a good huff and stamp the image next to the wheat. Use the stamp-a-majig if needed. Cut a layer of Always Artichoke and Soft Suede for a double mat. Use the Ticket Punch on all three layers then adhere together. Mount this unit on to the card using dimensionals.
Adhere the entire unit to the card base.
Summary
Stamps: Autumn Days and Falling Leaves
Paper: Soft Suede, Always Artichoke, Whisper White, and Autumn Traditions DSP
Ink: Soft Suede and Always Artichoke
Accessories: Big Shot, Texturizing Plate, Ticket Punch, Paper Pierce, Mat Pack, Ribbon, Stamp-a-majig, Dimensionals, Adhesive
Halloween is just around the corner and it’s so much fun to see the exciting anticipation in my grandsons’ faces. We are counting the days and talking about costumes. Even though they will not go out door-to-door, they still get disguised and go to our civic center’s Fall Festival where they will have plenty of safe games and fun for the local children. Personally, I like those hot dogs they serve right off the grill. At any age, Halloween makes us smile.
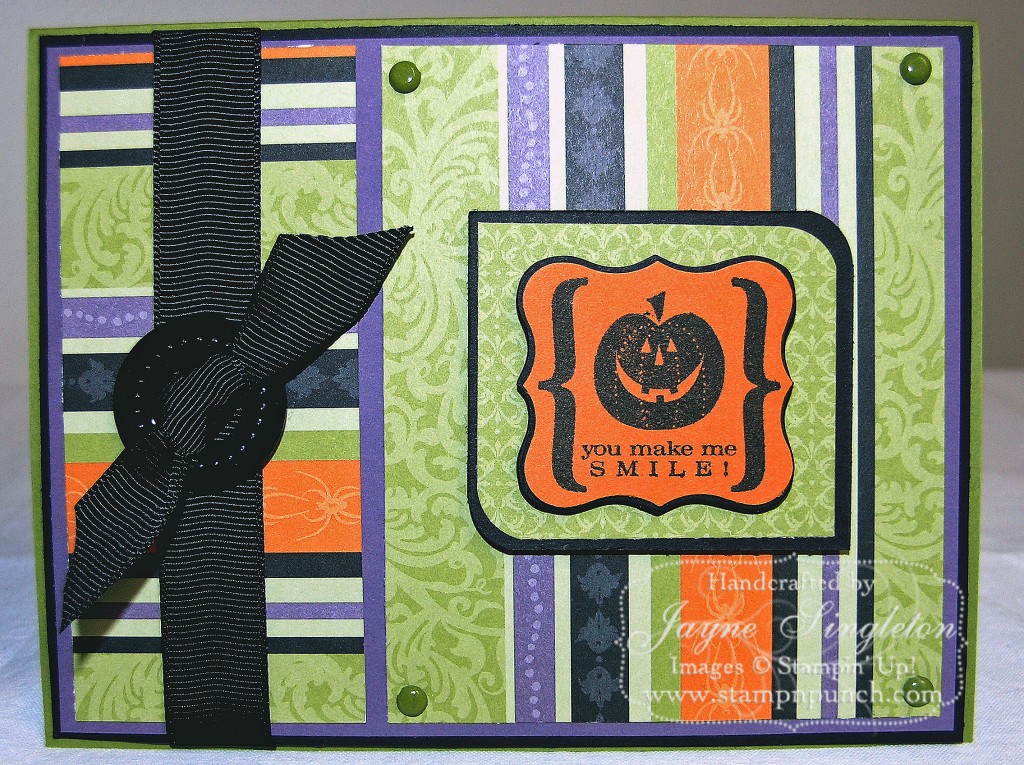
The base of the card is Old Olive. Set this aside until the rest of the design is completed. Layer a piece of Perfect Plum on to Basic Black. Cut these so only ⅛” border is showing on each side.
Next comes 2 pieces of the DSP from Cast a Spell; one cut vertically and one cut horizontally. I absolutely love this pattern.
Before mounting, adhere a piece of ⅝” Basic Black ribbon onto the vertical cut DSP and attach a Black grommet at the center. Mount these onto the design base and adhere the ribbon at the back. Knot and trim an additional piece of ⅝” Basic Black ribbon and attach with a glue dot. Attach four Old Olive brads in each corner of the horizontal cut DSP using the paper piercer and mat pack for placement. Attach the design unit to the Old Olive Base.
Stamp the image from Eat, Drink & Be Scary using Basic Black on Pumpkin Pie Cardstock. Cut out the image using the Curly Label Punch. With the Sizzix Big Shot, cut a mat for the punched image from a scrap of Basic Black, using the Movers & Shaper Curly Label die. Adhere these. Cut a piece of the Old Olive design from the Cast a Spell DSP and a mat using Basic Black cardstock. Use the corner rounder punch to round 2 opposite corners. Mount the Curly Label component on to the mat set with Dimensionals. Adhere this unit to the card also using Dimensionals.
So far, this card has my vote for this year’s Halloween card. I’m not quite finished experimenting just yet.
Summary
Stamps: Eat, Drink & Be Scary
Paper: Old Olive, Basic Black, Perfect Plum, Pumpkin Pie and Cast a Spell DSP
Ink: Basic Black
Accessories: Big Shot, Movers & Shaper Curly Label Die, Curly Label Punch, Corner Rounder Punch, Ribbon, Grommet, Brads, Dimensionals, Adhesive

Kristen’s Shower Card
My lovely cousin is getting married, and yesterday I attended her bridal shower. I went to the department store earlier in the week to purchase a gift and had it wrapped. I chose this particular wrap design because it appeared to bevery similar to the Manhattan Flower embossing folder. My card, simple as it is, made a gorgeous companion to my gift. I used a clear translucent envelope which gave my gift the WOW factor.
The base of the card is whisper white cardstock. Insert a piece of Real Red cardstock (4×5) into the Manhattan Flower embossing folder and run through the Sizzix Big Shot. Trim away the top un-embossed area. Mount this onto the base.
Stamp the sentiment from the Oval All set using Real Red Classic Ink on Shimmery White cardstock. Rub the back of the image with waxed paper and use the Punches Plus Classy Brass Stencil oval with a light box to emboss the oval. Punch this out using the Oval Punch. Next, punch a scrap of Real Red cardstock using the Oval Scallop Punch and mount the sentiment onto it with adhesive. Use Dimensionals to adhere to theset to the card.
Lastly, tie at simple knot using Whisper White Organza Ribbon.
The Shimmery White cardstock and organza ribbon make this an elegant card using any color cardstock. I also use velum to emboss the design and mount it on a soft subtle cardstock base
I can’t wait until the next time I need a gift. The department store also has another design that will coordinate with the Tart & Tangy stamp set.
Summary
Stamps: Oval All
Paper: Whisper White, Real Red & Shimmery White
Ink: Real Red
Accessories: Manhatton Flower embossing folder, Big Shot, Scallop Oval Punch, Oval Punch, Punches Plus Classy Brass Stencil, Wax Paper. Light Box, Ribbon, Dimensionals, Adhesive