Archive for the ‘Techniques’ Category:
Rev Up the Fun
A few weeks ago I took a weekend road trip to the prairie with my peeps to visit my upline, Pam D'Urso in Mahomet, IL. We always have such a great time together and I always learn an abundance of tricks and techniques when I'm with them. We had a shoebox exchange and the theme was to create a one-layer card. This was a super challenge for me as I'm a layer gal. Love those layers!
Anyway, this card was designed by Sally Nusbaum. I was anxious to use the new Rev Up the Fun stamp set so I adapted her card to make it my own (so to speak). I created 7 masks and used purple painters tape to navigate through the sponging process. Each mask was labeled and numbered to make this card super easy for my customers.
This a great card for any Harley Guy.
Watch for my shoebox card in a few weeks. (I'm holding out as it is going to be featured at my July Stamp Camp.)

Stamp Set: Rev Up the Fun
Paper: Whisper White
Ink: Smoky Slate, Crumb Cake, Soft Sky, Daffodil Delight, Stazon Black
Tools & Accessories: Sizzix Big Shot, Oval Framelits Die, 1" Circle Punch, Stamping Sponges, Torn Paper Strips, Purple Painters Tape

Faux Patina
I recently attended a Stampin’ UP! demonstrator event hosted by Sally Nusbaum. We affectionately call these events, “Sally’s Regionals”. We spend half of the day observing demonstrations and the other half doing make & takes that feature new Stampin’ UP! products. I have been attending Sally’s Regionals for the past several years and the one held in September was by far my best experience.
The Faux Patina technique was a fabulous demo presented by Mary Derhake. As soon as I saw it, I couldn’t wait to try it.
My customers had a great time on Saturday making this card. They changed the stamp on the Jewelry Tag using the "4 you" stamp making a brithday card. This shows how versatile this card can be.
Stamp Sets: Serene Silhouette, Tiny Tiny Tags
Ink: Crumb Cake (stamp pad and marker), Marina Mist, Always Artichoke, Early Expresso, VersaMark
Paper: Always Artichoke, Marina Mist, Very Vanilla
Tools & Accessories: Sizzix Big Shot, Vintage Wallpaper Embossing Folder, Gold Embossing Powder, Heat Tool, Color Spritzer Tool, Crumb Cake 3/8” Satin Ribbon, Vintage Trinkets, Jewelry Tag Punch, Linen Thread, Paper Piercing Tool, Stamping Sponges, Dimensionals

Comfortable Folds
This card was so much fun to make. I love paper folding and with a little Dotto, I was able to reposition each petal until it I got the perfect fit.
Stamp Set: Curly Cute
Ink: Soft Suede
Paper: Crumb Cake, Soft Suede, Very Vanilla, Cajun Craze and Comfort Café Designer Series Paper
Tools & Accessories: Large Tag Punch, 1” Circle Punch, 1’ Square Punch, Cajun Craze from the Regal Designer Button Collection, 1/8” Very Vanila Taffeta Ribbon, Paper-Piercing Tool & Mat, Dotto, Adhesive, Glue Dots

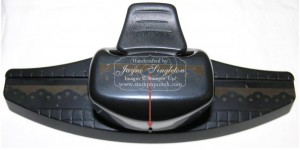
Border Punch Tip
The red line on the photo indicates the center of the punch.

Along the back of the punch are guidelines. Center your paper using the guidelines. Make your first punch.

Move your cardstock to the left/right to punch the rest of your border. Use the silver images on the punch to align previously punched sections. Place the punche area precisely over the silver images until you can no longer see any of the silver. Then punch again. Move your paper along until you reach the end.


